Friday, March 9, 2012

The Weekend Eventful

Weekends when Taron and Keaton are with us I would say are generally rather eventful.
Nothing grand or out of the ordinary, just more involved and productive I guess...
Maybe it's Cooper and Ryder's excitement level that makes it feel eventful!


This last weekend, during the day before Stephen left to go get them, he changed out a blown lightbulb in the  laundry room for me. Cooper was intrigued by the old bulb and really wanted it as a treasure to keep and play with! Anything is a treasure to this little dude! Well, of course we can't let him play with a lightbulb, so to ease the anxiety, I set to work crafting a lightbulb out of paper... could've turned out worse I daresay :} And then Ryder needed to have his picture taken too- with his favorite, trusty treasure, "black guy." :)


 Taron and Keaton were super excited about the puppies this trip- they seemed to want to soak them up all they could. Four boys and seven puppies= fun for sure :} 


Friday night we had some friends over to join in the fray and I made these sugar cookie bars I had seen on Pinterest. Verdict: Awesome! I might not ever roll out and cut sugar cookies again ;) Not really, of course, but these really were divine with much less work! I like that I didn't have to douse the dough in flour first.


Saturday everyone seemed discontent inside, so, even though it was rather nasty out, Stephen loaded up all four boys and headed into the desert for some exploring and shooting. Little Ry wanted so badly to go- he is forever getting left behind- so I sent him with. Well, of course, while they are all out there, they get stuck in the mud and had to be rescued by Stephen's wonderful friend, Brad... The older boys are capable, but I was nervous for my little guys for sure! None of them seemed too flustered in the end, though... :) Such is a boy's life!


On Sunday after Church, Cooper decided it was time he took his money making endeavors to new heights. He asked if he could set up a lemonade stand (as he's digging cups out of the cupboard). When I said it was too cold for that yet, he immediately suggested that he do a cocoa stand! Cute, but still, no. So he set up an indoor stand for his brothers. He put a few chips inside these little mini cups and set them out for grabs. No sign or even a full size table- he didn't even think about the details, other than the collection cup. :) Taron and Keaton scoured the couch cushions and raided Dad's pockets for change- it was pretty darn cute and clever!


Sunday night we tried plying Words with Friends old school, but it lasted only a few rounds before Stephen  decided it was too slow and the little boys sealed the decision for everyone :} We opted for Bingo instead :)

The older boys didn't have school Monday, so we got to have them an extra day! It was finally nice out and we all went on a walk up the street. As always, Coop and Ry wanted their scooters, but abandon them just a few houses down... usually I'm stuck dragging them both on each side, but the older boys got a ride in too after all this time :)


Meanwhile Coop gathered treasure like this sweet dried flower and Ryder made sure he didn't have to wear the same clothes all day... :)


Simple, good times!
Photobucket

Wednesday, March 7, 2012

Selflessness

Not too long ago I got to give a little talk during our ward's monthly Relief Society meeting on the topic of 'Overcoming the Winter Blues.' Guess I needed to hear it most, cause sure as sure I'm not the expert on the topic!

Toward the end of the talk, someone asked a question: Really, HOW do you force yourself to do things like go out for a walk when you simply don't feel like doing anything at all? HOW do you honestly shake a sense of depression? Well, the answer I gave and some others kinda chimed in on as well, was about as lame as it gets: You Just DO. You find it inside somewhere, somehow and you just DO.

I've thought a lot about my lack of answer since then. And if I could go back to that moment again, I think I'd say something to the extent of this:


When you don't feel like doing anything, what is it that motivates you to move from that point eventually? When I've had two hours of sleep for three nights in a row and I want to do about anything but build another block tower or accomplish the housework, sometimes, yes, the yuckiness prevails and we watch Netflix non-stop. But more often, the fact that I care more about my husband not coming home to a war zone and a smelly wife; about my boys being fulfilled and taught to the degree they deserve; about life getting at least a bit closer to the ideals I once had, than I do about how tired I am, gets me to accomplish more and shake the negative. I can overcome when I'm not focused on ME.

And the more I think about it, I really think, indeed, it could be said, Selflessness Solves Everything; the Solution if Selflessness, across the board in life. Of course I could go on and on, but the point is really to think about it for yourself I guess... The next time you contend with depression or with conflict or dis-ease, test it out: what is it that you care more about than yourself, that will motivate you to move?


You can click on these images and then right click to save and print an 8 x10 :)
Mine's going on my bathroom mirror.

Photobucket

Monday, March 5, 2012

Broth and Stuff

Awhile back, I saw THIS post about making chicken broth at Momnivore's Dilemma.
For some reason, her posts about real food are intriguing to me-
I already cook from scratch, but if I can just change my process a little to have
the foods I serve be even healthier, then super!
And Nicolette is down-to-earth about how to cook "old school."
Anyhow, I decided I would try it out and make my own broth!


I actually made turkey broth, since I cooked a turkey one Sunday and had a turkey carcass to work with. Above is what I started out with- onions, celery, carrots, a few cloves of garlic, all chopped coarsely and tossed in with my turkey carcass and a gallon of water...


I cooked it on medium for half an hour or so and then turned it to low. I started not too long before I went to bed and this (above) is what it looked like when I woke up in the morning! It sat there all day, cooking for a total of just barely under 24 hours. I read some other recipes that said to cook only four to six hours , but I trust Nicolette that 24 hours is better and it was no skin off my nose to just let it cook. It looked like this after I had strained all the liquid off:


And here's my broth! I wish I would've had a smaller, wire strainer to make it even cleaner, but oh well. This tasted like pure comfort! So much more flavor that store bought. And more than anything, I just liked how I felt knowing that I had made my own broth! Two nights later, I made homemade egg noodles and used it for turkey noodle soup- yum! All I know, is I will never toss a carcass again!


And as for other stuff... we recently had my sisters and their families over for dinner and games. The boys love playing with their cousins! They put on a fashion show (wherein, I realized how sad my selection of dress up gear is :/) and packed onto the bed to watch a movie... for a few minutes, until they got bored and needed some other entertainment! :)


And guess who recently won 2 yards of fabric from fabricworm on SewCanShe?!? There is just about nothing I love more than new fabric! Aren't these ones so fun?!


Photobucket

Friday, March 2, 2012

Coop Behind the Camera


Quite awhile ago, my parents gave Cooper a bright orange Kidizoom camera.
It's popularity among his favorite things kinda comes and goes,
and right now, it is IT in his world.
He takes pictures of everything! And I really mean everything-
the thing holds 648 pictures and I've now moved them
to our computer twice in the last month or so!
This most recent download, I actually was quite intrigued by-
what a peek into my little guy's head and personality!
I couldn't resist sharing, ya know, a few:
(totally unedited, I might add)


There were lots of his little brother, most of them looking like that blur above! Ryder is too fast and Cooper doesn't always (hardly ever) hold still through the entire click either! I will say that this is a pretty sweet shot of our family friend, Gary, though :)


This one he actually asked me to take, of "just me and you" :)


Froggie keychain flashlight, amazing huge shell from Grandpa and Grandma, his art on our board, vitamins he takes and loves, his foot, Wild Kratts on TV, the awesome tooth necklace he found at a gas station and paid for with his own money, his rocket boots, a fort... ya know, the really important stuff :)

I can't even explain how I melt seeing all these! I'm sure it's all worthless to most anyone reading, but this is his creative, bright little world and I just couldn't love him more!


There was a huge amount of this little guy above, who I think lately is named "Stinky Walnut Tree." If there is anything he loves more than this camera right now, it's his albino leopard gecko! I'm quite sure it doesn't love him as much... he's probably more like it's own personal "Darla." What'da do? :)


And of those 648 images, the very largest majority of them are self portraits... which I love! This one above is adorable! He makes me smile and laugh!


See that wink and kissy face?!?
Watch out world...


Photobucket

Wednesday, February 29, 2012

Ruffly Patriotic Wreath Tutorial


If you are here from Pinterest, I'm so glad to have you here at Capital B!
 This little blog is what it is, to some degree, thanks to this stunning little wreath...


It's easy to see why, eh? There is something about it that really is just stunning!

When my friend and I made these wreaths originally, we were just wanting to spend the afternoon making something cute.  Never would've guessed then that I'd do a tutorial and get to see lots of these made from it- I love that! Hopefully it will prove helpful for you too :) If you like the wreath and use the tutorial, I'd love for you to follow Capital B on Facebook or Twitter through my social media buttons in the sidebar too- thanks!

If you might be more interested in purchasing one instead, please email me through the button in my sidebar. I may possibly have them listed in my etsy shop also...

Ok, lets make it already! 


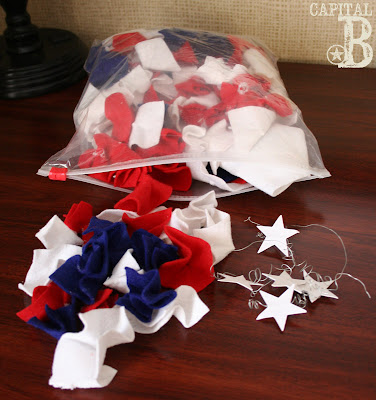
That crumpled baggie there is what is left of the exact wreath that I made originally... truth be told, it got split to pieces just a few days after I hung it on the door!


I love taking pictures of stacks of things- just makes me smile for some silly reason. :) Ok, so take your sheets of felt- I got mine and all of the supplies for this project at Michaels- and cut them into squares about 2"x2". I did not spend any time at all making sure they were perfect- I just eyeballed it. It is important to make sure all the squares are roughly the same size, but not exact for sure. Also, these stacks above are roughly half of what you'll actually need!


Regarding "nevermind the skewers"- when my friend and I first made these, we used hard, white styrofoam wreath forms that were flat on the back and skewers to punch each felt square inside it. We really were just wingin' it and it seemed to be working! But, all those big holes we made- like this one above- no doubt contributed to the reason my wreath simply did not hold up to any kind of test! The wreath had been so weakened by those huge holes! So that's why I'd say a rounded, softer wreath is better!


Instead, I got a box of straight pins and wow! Putting it together was easier and faster for sure! And I am not one bit worried about it holding up this time. Also, the pins never came close to poking through the other side. I did want to make sure the look would be the same, so as I was getting started, I made sure to keep looking at the pics of my old wreath... I really felt like the look was identical!

Work with just one square at a time, folding corner to corner in half and then half again. Again, no science here. I noticed that not matching the corners exactly worked fine too- there will be a fair amount of adjusting as you go anyways. Pin the piece (which now looks more like a triangle) straight in at the folded tip.

I started the very first few pins putting the points together and then opening them up to look more like a bloom (above). I didn't pin my pieces all the way around the wreath- the back is still empty. If you wanted, you could cover it all, though you'd need even more felt and whatever it was hung against would squish the look of it anyway. :) Just make sure you go around far enough that you won't see the green from side to side.


As you get more pieces pinned, you're no longer putting them point to point, more like row upon row. Kind of hold the pinned pieces back and tuck new piece in close, like below:


You do want to make sure the pieces are close together, though not too close- the tighter you pin them in, the more "squished" of a look you'll have- a titch of space in between the pieces give you more room to make it look fuller in the end.

And you'll just keep going, folding and pinning, folding and pinning! Think like two movies or maybe three worth of folding and pinning... Needless to say, I did NOT make this thing in one sitting! In fact, I took the makings with me on a trip with my husband and worked on it in our hotel to begin with so I didn't have the distraction of the boys!


As you go, you'll want to watch that the outer part of each section of color is a bit wider than the inner part- like this pic above. Just pin a few more pieces on the outer edge than the middle. Again,  this wasn't measured out, just eyeballed. Also look to try and keep the white sections about the same width as the red- so you don't have thin little pieces of one or the other, but a look more like our actual flag. :)


See what I mean about "just keep going!" As you go, you'll kinda pull and adjust on the corners to get the look you want and make sure your pins and spaces are covered, like below:


Notice above about how much space I left for the blue- could've been less if you prefer as well. I like the look of both the sections bordering the blue being white too. I did work from both sides of my red and white sections as I went along- not in just a big row sort of thing, if that makes sense. I wouldn't say this matters, but it may help you keep things uniform looking too. :) Carry on folding and pinning your blue pieces once you have about the right amount of space left! And when it's all filled- woo hoo! It's pretty, eh? ;) On to the springy stars:


I did cut the stars out with my Cricut, though it's certainly not a necessary tool for this- you could freehand them with pencil and cut, or use a star punch. Mine were 1 1/2" each. I cut 14 stars out of full sheet label paper, though plain cardstock and a glue stick would be just as fine.
With all your stars cut or punched, cut yourself seven pieces of craft wire (or whatever the number of stars you want on the wreath) about 10" long or so. There were only five stars on my original wreath, but I think they're pretty fun, so I wanted a few more on this one!

Curl your wire around the crayon or pencil or whatever you are using- like in the left corner above. I used a bigger crayon, but it's all the same really. Once you pull off the curly wire, straighten it a bit again in the mid section. Then stick or glue your stars back to back on that straight part! See why I used label paper? No need for the glue made it a bit quicker, but again, anything goes. A dab of hot glue would be swell also. :)


Now adjust your curly star so it looks like you want- there really is quite a lot of adjusting and twisting the curly stars as you go, at least there was for me- making sure they bend the direction you want and all. I also liked my curl being a bit smaller at the end- just lightly grab that last bit of curl and twist by hand. :) Then straighten the opposite end a bit again- you'll stick it into the foam just like you have been the pins! It's quite a lot more flimsy, so hold it close to the base, maybe kinda move it a bit as you go. I also had to kinda push back the felt to find a place for each star.


Woo hoo- we're so close! And aren't they so cute?! I used four stars around the outer part of the wreath and then the other three just underneath and in-between those four. Again, adjust and re-curl the wires lightly to make sure they are going the way you want and compliment each other. :)


Last thing, grab whatever ribbon you desire for a hanger- I wanted mine to blend in with the door rather than stand out, so it's small and white- and trim about a 12" piece or so. Put the ends of your ribbon on top of each other to form a loop. I thought I'd be able to just use a couple of pins to hold the ribbon on the back, but they were too small at the head and the ribbon tore through. So, I punched out two straight staples from my stapler and pushed them in crisscross of each other at the ends like above instead- it held just fine for me while I was hanging and adjusting!

And there you have it!
My four year old said it "Looks like the pledge of allegiance!"
which he apparently says in preschool- bless his teacher!


Indeed, I was tempted to leave it on my door and just pretend it was summer... but then I realized I was standing in an inch of snow from the night before and wearing my awesome purple snow boots. :) So it is now listed in my previously empty etsy shop, for better or worse!

I will say, I think this is one of my favorite crafty accomplishments ever- both the original and this one. It just looks pretty and catchy. :) It takes time, but it's simple. It has feeling and movement to it. God Bless America!


I hope anyone wanting a tutorial from Pinterest (or wherever else)
finds this and finds it helpful! 
Thanks for looking!


Photobucket

LinkWithin

Related Posts Plugin for WordPress, Blogger...