


Honestly, I know I'm really not great when it comes to floral design. I really liked the look of these cool purple/red leaves, but knew I'd be stretching myself a bit to do anything real grand!
The teal charger and the bunch of leaves were all I bought at Michaels. The chevron burlap ribbon and strand of berries I already had at home, as well as, of course- all those twigs!

If you follow on Instagram (or read my personal posts) this pic looks familiar, eh? :) Ryder joined me on a little expedition for the twigs to make this project. I got the idea in my head that I could use them as a starting point for the centerpiece- I knew I'd like the rustic look. So we gathered up a big bag full and walked back home, using big long ones as pretend metal detectors along the way, of course :)

I pulled all the leaves off and laid a bunch of twigs together. I used this tall plastic tumbler as the form to wrap the twigs around- it was just what I had available that would work. I know the dollar store sells glass cylinders that would work great too. I just laid and tied the two like above- I really didn't know exactly how to start, I was kinda wingin' it and this seemed to work...

I just maneuvered the twigs around, pressing them against the table at times, until I had covered the full circle. It will be rough and imperfect. It will take a bit of playing with and trying to use one hand when you need two! When I felt like it was decent enough, I wrapped even more jute even more tightly around the twigs.
Then I took remaining twigs and stuck them in to fill gaps like above. I honestly debated wrapping even more with jute and not using my chevron burlap- it would've looked good too. I ended up deciding to use the ribbon in the end, obviously :)

When I was happy with the thickness of twigs, I clipped them all down to be about the same height. I also paid attention to the curve of the twigs and tried to give it some nice symmetry. :)

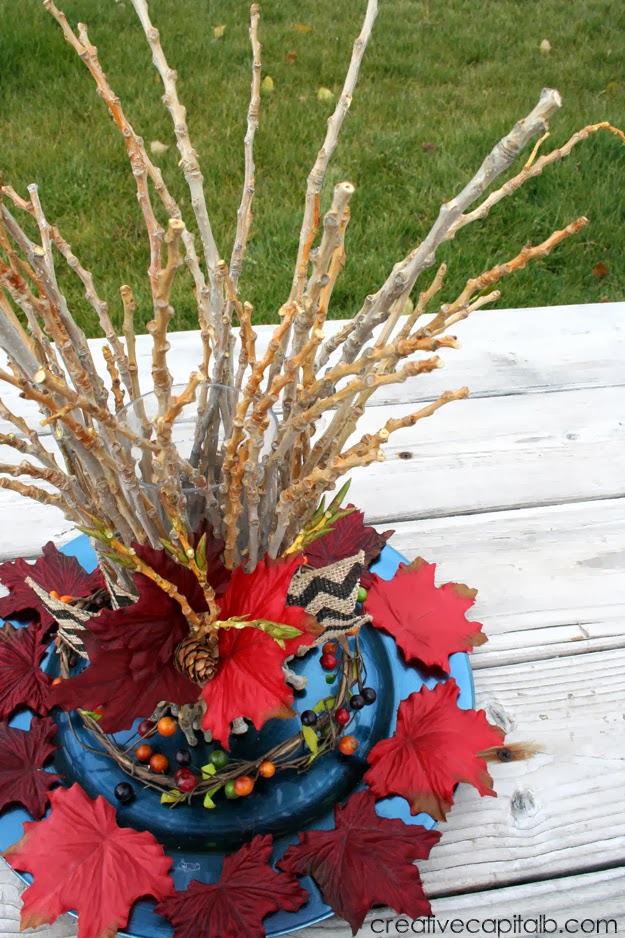
I added one round of the ribbon, then took a strand separately and folded it into itself at the center like above to create a little something extra for the front. I had in mind to add my reddish leaves at random to the twigs themselves, but decided it just didn't seem right. So I arranged just a few leaf and twig tops (the greener ends) in front of this ribbon portion, all wrapped with jute. The pine cone was part of the leaves I bought...


The charger seemed to need something more, so I used glue dots to adhere leaves individually around the edge. I like that it seemed to make the whole thing more full. Lastly the length of berries was wound together to fill in the base.

Stephen said he thought the cup could be a candy dish, so I tossed some suckers inside just for the heck of it. I actually thought some gold wrapped candies like Werthers or something could look really nice :)

Ultimately I was happy with this even though I had started uncomfortably. The twigs are kinda our style :) I don't often have a centerpiece on my dining table- it gets too often taken over by the daily goings on around here. So it's kinda nice to have something that prompts everyone to not mess it up with clutter! I think the twig theme could really be carried throughout your whole Thanksgiving spread and look really cute! Adding twig sprigs to napkin rings, etc would tie in really well :)


And I just love Emily's centerpiece- she picked these bright, fun flowers and her project just shines, doesn't it?! Make sure to check it out more in her Pretty Pair post HERE. Thanks for the fun again this month, Emily! And Happy November all!

