Hooray for sharing my first Valentine idea of the year!


I had bought the boys each something similar at a craft fair around Christmas time. Looking at that one, I realized I could use a heart for the snake head and it would work for this time of year instead. The fabric tube is filled with thin candies. We both wondered how we could put an actual Valentine message on them and had several different ideas before deciding to give the snakes a tongue with a note on it! This part is what really makes it in my opinion :)


Do you have a kiddo that thinks snakes are pretty cool, too?
Then let's make some stinkin' cute snake Valentines!
I'm guessing you can look at these little guys and know immediately what you need and how to do it,
but just for the fun of it, here's some more details:

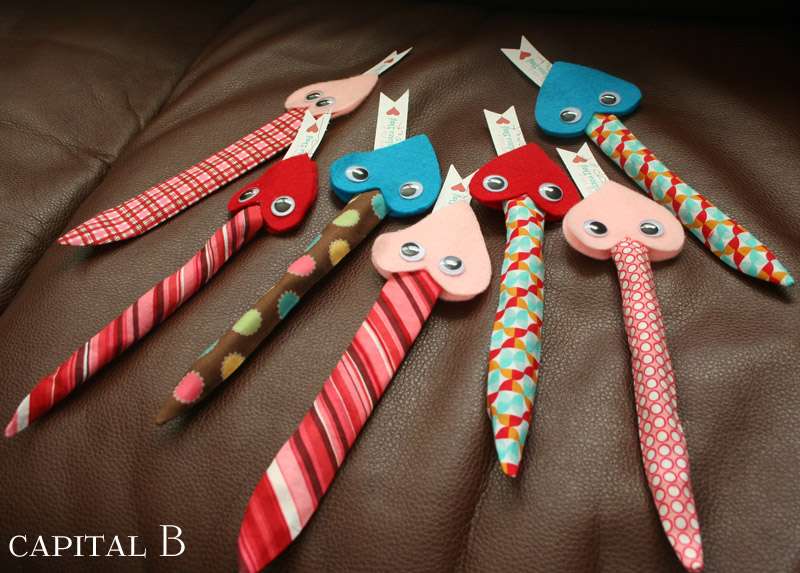
I used fat quarters for the fabrics- they don't save money, but they do save time! Not having to deal with the cutting counter is just a good thing some days, ya know? :) You'll need some Valentine type fabric- I really wanted to throw in some blue tones with the red and pink because Cooper's favorite color is blue- also some coordinating felt sheets, googly eyes, a hot glue gun and glue, measuring tape and scissors and the usual sewing basics :)

I measured and cut small pieces of fabric 8" x 2.5 - 3."
The smaller width will fit candies like Smarties and Jolly Ranchers, the larger will fit as wide as an Airhead.
Fold the piece in half, right sides together and sew down the long side, not quite to the end.
Make sure to back stitch a bit as you start.

A couple of inches from the bottom, angle your stitch to meet the opposite side of your piece at the very end. I then took pinking shears and clipped along that angled seam.

With your sewing part all done, turn your tube right side out! These are big enough to not be too big of a headache. At first I was just turning them with my fingers, but then I figured out I could use the end of my seam ripper once about half of it was turned.

Then I tried a pen and that worked even faster- this is great tool for turning these tubes! Once you've got the top turned a bit with your fingers, stick a pen in and use both hands to pull the fabric down over your pen with the end against the table. Couldn't get a picture of this really- ya know, given I only have two hands! Once you get going, this part will go pretty quick, really :)

I like to work in stages when I'm doing a bunch of one thing-
so here's a bunch of my turned tubes waiting to be ironed :)

Now lay your tube with the seam at the center and start ironing! On most of mine, I ended up with a bit of a pucker at the angled end. I just ironed it flat from the opposite side to create a bit of a pleat... from the top side, it was not visible or odd looking at all :)

And your sewing and ironing is done! Next I cut squares of my felt sheets- no precision to this at all, I just eyeballed it so I would get an even twelve squares from the sheet.
Then fold the felt square in half and cut the usual half heart :)

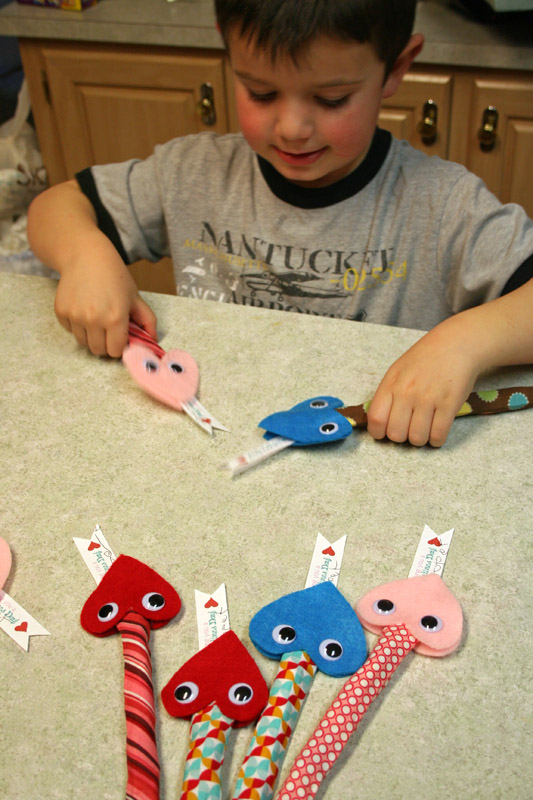
Now you'll place a bit of hot glue on the unfinished, open end of your tail tube and glue the top side of the heart to each side- I've got the hearts upside down in this pic above! With both of the hearts on, then glue your googly eyes.

On occasion, I accidentally glued my opening together! :/
I was able to pry it apart pretty easy, but just be aware of this as you glue...

Next you can either put your candies inside or glue the tags just inside,
on the bottom of the tube opening.


Our tongues say "Wisssssssshing you a Happy Valentines Day!" with a space for Cooper to sign his own name. He mentioned making cards for his whole class, but I had to twist his arm just to write his name alone on these few tags! With a class of 28, there will surely not be cards made for each of them!
I did have the thought that if he wanted to include a larger note or drawing, we could roll it up like a small scroll and slip inside first, then put the candies inside that scroll piece :)


If you'd like to use these same tags,
you can grab an entire sheet of them like above by clicking HERE :)
Then I cut them quick with a paper trimmer. I used the heart on the end of each tag as a guide
to created a forked tongue- clip into the tip of the heart from one side and then the other.

Here you can see what the different widths turned out like. I personally preferred the thinner ones, though the bigger one does give more options for what to fill them with. Surely there are lots of non-candy options if you'd rather. I thought a couple of pencils, glow sticks or plastic straws could work too :) We'll be trying several pixie sticks, small dum dum pops, and wrapped gumballs too.

And there you have it- a cute handmade Valentine option for your little animal lover!
Cooper enjoyed playing with them once several were done...
Hopefully his classmates will be playing along with him on Valentines Day :)