Awhile back I drove past Porter's Craft and Frame, our great locally owned craft store,
and saw nothing but huge letters in the entryway.
I wanted to switch lanes and go in right then!
I couldn't really stop that very minute, of course, but I did go within that week
and grabbed up- what else- a 2' capital B!
I knew I didn't want to Mod Podge. Or wrap it. I just wanted it to be... well... metal. In looking at it propped all bare against my fireplace, I was thinking I would prefer it be distressed metal. So, I determined I'd fake it! Surely I could paint the chipboard so that you'd never guess it even was. (Really what is this material called?? Is it paper mache? Is it chipboard? Hmmm... it's paper whatever you call it!) :P
I was so excited about my thought train! This turned into a fav project for sure :) This could work for anything chipboard- isn't there a whole chipboard aisle at most craft stores? Birhouses (I think that could look super cool!), ornaments, boxes- if you have any desire toward metal instead, read on!
I started with the three paints above:
1) A basic, glossy gray acrylic.
2) A rust orange acrylic.
3) An acrylic specifically labeled "Metallic." I chose a sort of sage green/gray color.
Start with the glossy gray acrylic and paint the entire letter. I actually only did one side because I'm too impatient to have to wait to turn the thing over each step in the process! I like the idea of hanging this on a wall actually, so for me leaving the back bare worked. :)
And foam brushes are seriously the stinkin' cheapest thing on the planet... but, still, I own exactly one of them! I could find only this lone brush in all my craft supplies when I went to start this project. So I rinsed it and dried it with a paper towel between each painting step. Actually worked just fine! :)
Keepin' it real: I did end up with this one problem area. Not sure honestly what I could've done to prevent it... less strokes with the brush in one spot? Less paint on my brush to begin with? Really not sure. But I also wasn't too worried about it- I knew I was only just beginning and could easily mask it with the remaining painting. If you try this and get a bubbly spot too, no worries- you'll quickly hide the problem at all!
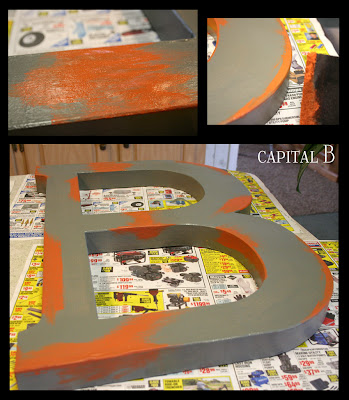
Next take your rust color and dab a bit onto just the corner of your brush. Take that paint and brush it onto random areas over your base gray coat, specifically any problem areas like that bubble above. The pic in the left corner above is that same spot with the orange over the top- see how I'm adding dimension to make it no big deal? :) Keep adding orange bits and pieces until you've got a balance you like. I did try to focus on contours and edges more than the surface :)
Once that's dry, take your metallic paint and go over the whole thing again. For me, this did take more than one coat- the metallic paint was a bit more opaque.
See how that last paint doesn't totally cover the orange underneath? I was starting to get excited at how it was looking already!
I even propped it up and wondered if it could be considered done...
and quickly decided the answer was no.
It just needed something more...I wanted my "rust" to be more profound.
I used a paper towel as my paintbrush for this last part and worked with my fingertips. Dab a tip of the paper towel into your orange paint. Then smear that paint back and forth over the same areas you already painted orange before- you should still see them through the metallic.
I put this first stroke of orange down fairly slow and thicker,
then made quicker, firmer strokes to eliminate some paint and make it look more realistic...
Keep going with this same technique over your whole project- it'll get smoother and easier to get the look you want as you go :) Here's a few more detail shots so you can see what the finished details looked like:
Does it look done now? I was rather pleased with the outcome! The more and more I've looked at it, the more I really think it does indeed look like metal- not at all like chipboard for sure! Crazy to think with just a few small bottles of paint I started with this...
And ended up with this...
It's still very simple, but now very striking and modern too!
I recently moved it up onto my Easter mantle to fill some space-
I will always be able to find a great place for my chipboard metal monogram!
If you happen to fake metal yourself, I'd love to see it!


